
The Best Bakery Style Chocolate Chip Cookies
Disclaimer: This post may contain affiliate links. Please read our privacy policy.
Bakery Style Chocolate Chip Cookies are crispy, chewy and soft. They have a ton of delicious flavor due to adding extra vanilla, salt and brown sugar. This is my go-to recipe for cookies!
I could eat all the cookies in the world.

If they’re chocolate chip. Well…I take that back. Cookies are my thang, one of my favorite sweet indulgences and one of my very favorite desserts to make. So yes. I could eat all the cookies in the world.
What’s your favorite sweet treat?
Chocolate chip cookies are easily my favorite, which is why I am so ecstatic about this bakery style chocolate chip cookie recipe!
These are one of my best cookie recipes ever and I have made quite a few!

The BEST! Why? Because they are the perfect size – on a scale from 1-10, 1 being the smallest cookie and 10 be the largest, they’re like a 6 or 7. Not too big but definitely not too small (who wants a small cookie anyway?) They’re crispy on the outside and incredibly chewy and delicious on the inside. The perfect combo for any cookie, right?
And they bake up beautifully – they don’t get flat or stay in a clump, they spread nicely and, and are perfectly chewy.
Ugh, I love these!!

See? I mean check.these.out. I did put the dough in the refrigerator for 30 minutes or so. I typically chill all of my cookie dough recipes as I find they bake up much nicer that way.
Plus. Chilled cookie dough? Yes please!
Now, if you like a crispier cookie, you could bake these a little longer than I did. I am a sucker for gooey soft cookies so I kept mine just slightly browned on the edges.

Oh what a beautiful a thing. Look at all those chocolate chips! They create mounds of delicious gooey chocolate and give the cookies that bakery style look.
I have to mention – these are amazing warm, with ice cream and FROZEN. Yes, I put some in the freezer and munch on them at night.
Those are the best nights ever.

You HAVE to make these. Please!
SHOP THE RECIPE – HERE ARE SOME ITEMS I USED TO MAKE THIS RECIPE.
Cookie Dough Scoops (set of 3) – I use these all time when baking cookies. My cookies always turn out the same size and it saves a ton of time. They are also great for scooping muffin and cupcake batter as well as ice cream!
Non-stick baking mat – These help cookies not stick to the pan and help minimize trash!
KitchenAid Mixer Artisan Series Mixer – This one is a no brainer. I love my KitchenAid Mixer. It’s simple to use and does a wonderful job of mixing all kinds of doughs, batters, etc.
Nielsen-Masey Pure Vanilla Extract – This vanilla extract is just the best. It will take your flavor to the next level and a little goes a long way.
Silicone Spatulas – These are wonderful for all types of cooking, but I love a good spatula to scrape the bowl while mixing. It’s important to get all the dough incorporated and a strong spatula is the way to do it!
The Best Bakery Style Chocolate Chip Cookies
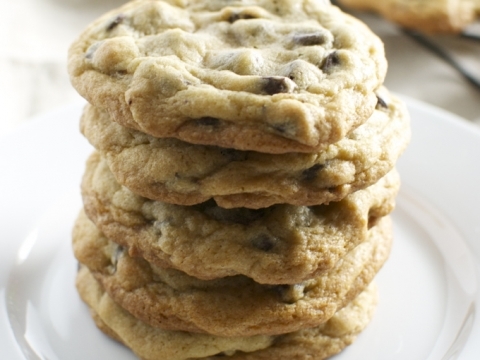
These bakery-style chocolate chip cookies have golden, slightly crisp edges, soft and chewy centers, and plenty of chocolate chips in every bite. Made with dark brown sugar, extra vanilla, and a little extra salt for flavor, they're everything I love about a really good chocolate chip cookie!
Ingredients
- 2½ cups all-purpose flour, spooned and leveled
- 1 teaspoon baking soda
- ¼ teaspoon baking powder
- 1 teaspoon salt
- 1 cup (2 sticks) unsalted butter, softened
- ½ cup granulated sugar
- 1 cup packed dark brown sugar (light is also fine)
- 2 large eggs, room temperature
- 1 tablespoon pure vanilla extract
- 2 cups semi-sweet chocolate chips
Instructions
- Combine the dry ingredients. In a medium bowl, whisk together the flour, baking soda, baking powder, and salt until evenly combined. Set aside.
- Cream the butter and sugars. In a stand mixer fitted with the paddle attachment (a hand mixer works, too), beat the softened butter, granulated sugar, and dark brown sugar on medium speed for 2–3 minutes, until creamy and slightly fluffy. Scrape down the sides of the bowl as needed.
- Add the eggs and vanilla. Add the eggs one at a time, mixing on medium-low speed just until incorporated after each addition. Mix in the vanilla extract until combined. There's no need to beat the mixture until pale in color.
- Add the dry ingredients. With the mixer on low speed, gradually add the dry ingredients, mixing just until a few streaks of flour remain. Remove the bowl from the mixer and fold in the chocolate chips by hand until evenly distributed and no dry flour remains. Avoid overmixing once the flour has been added.
- Scoop and chill the dough. Scoop 3 tablespoons of cookie dough per cookie and place the dough balls on a parchment-lined baking sheet or plate. Cover and refrigerate for at least 2 hours or overnight. The dough should be cold and firm before baking.
- Preheat the oven. When you're ready to bake, preheat the oven to 375°F. Line a light-colored baking sheet with parchment paper. Arrange 6 chilled cookie dough balls on the baking sheet, leaving plenty of space between them. Keep the remaining dough refrigerated while baking in batches.
- Bake the cookies. Bake for 9–12 minutes, or until the edges are set and lightly golden brown and the centers still look slightly soft. Mine typically take 11–12 minutes, but baking times will vary depending on your oven. The cookies will continue to set as they cool, so be careful not to overbake them.
- Cool and enjoy! Let the cookies cool on the baking sheet for 5 minutes before transferring them to a wire rack to cool completely. For perfectly round cookies, place a round cookie cutter or glass slightly larger than each cookie around it immediately after baking and gently swirl in a circular motion to shape the edges.
Notes
Measuring flour: Spoon the flour into your measuring cup and level it off with a straight edge. Avoid scooping directly from the flour bag, which can pack too much flour into the cup and result in dry cookies.
Butter temperature: Use softened butter that is still slightly cool to the touch. It should give when gently pressed but shouldn't look melted or greasy. Butter that is too warm can cause the cookies to spread excessively.
Cookie dough consistency: The dough should be soft but thick enough to hold its shape when scooped. It may feel slightly sticky before chilling, which is normal. Avoid adding extra flour unless you've confirmed that your measurements are accurate.
Chilling the dough: Don't skip this step! Chilling helps control spreading and gives the flour time to hydrate. You can refrigerate the dough overnight if you prefer. For longer storage, freeze the portioned dough.
Preventing flat cookies: Always bake with cold cookie dough and use a completely cooled baking sheet for each batch. Placing chilled dough on a hot baking sheet can cause the butter to melt too quickly and lead to excessive spreading.
For softer or crispier cookies: I prefer mine with lightly golden edges and soft, chewy centers. If you like a crispier chocolate chip cookie, bake for an additional minute or two, watching carefully.
Storage: Store baked cookies in an airtight container at room temperature for 3–4 days.
Freezing: Baked cookies and unbaked cookie dough balls can be frozen in an airtight, freezer-safe container or bag for up to 3 months. You can bake the dough directly from frozen at 375°F, adding approximately 1–2 minutes to the baking time. There's no need to thaw first.
Nutrition Information:
Yield:
22Serving Size:
1Amount Per Serving:Calories: 262Total Fat: 14gSaturated Fat: 8gUnsaturated Fat: 5gCholesterol: 39mgSodium: 182mgCarbohydrates: 35gFiber: 1gSugar: 23gProtein: 3g
Nutrition information is automatically calculated. Use as an approximation only.



The turned out wonderfully! Thank you for the great recipe. I’ll be adding it to my favorites 🙂
You’re welcome karie! So glad you liked them!
I thought I measured everything correctly and followed the directions but they did not turn out right. They got really fluffy and cakey. They came out more like biscuits than a cookie. They cooked fine and didn’t really taste bad but they were too fluffy and not what I wanted. Any idea what I could have done wrong? Thanks!
Hi Megan! Sorry they didn’t turn out for you. You may have over measured the flour causing them to be thicker. I’m not sure why they would bake like a biscuit as biscuit dough is much different and flakier. You can try flattening the dough a little before putting them in so they bake flatter but I usually don’t have a problem with the dough spreading. Hope this helps!
Is it possible that you might have mixed up the baking soda and powder amounts? Baking powder generally makes things fluffier.
Hi Jenn – good point! Yes, make sure you use more baking soda than baking powder. It’s easy to accidentally mix them up.
I thought I measured everything perfectly as well but mine turned out very biscuit like as well, they were quite thick and rounded on top, not like you’re great pictures! They still taste fine though 🙂
Hi Madison – sorry to hear that. Try flattening the cookies a bit before you bake them and bake them a tad bit longer…like a minute or two to crisp them up a bit. Your oven is most likely the culprit…just heats differently that mine. Usually extending or shortening the baking time can fix fluffy or too crispy issues.
I had this happen lots of times with different recipes, a lot of time it was just the weather, but also I always fluff up my flour before measuring. I also accidentally used self rising flour a couple of times. Maybe try using a bit less flour? I also melt my butter before I add it in and mix until it’s cooled enough to add the eggs. Works like a charm! By the way, I am in love with this recipe!
Thanks for sharing your tips Koreena!
These have become a staple in my household! They are everyone’s favorite chocolate chip cookies (or favorite cookies in general) – my family & friends go nuts for them! Thank you so much this recipe! Can’t wait to try more from your blog!
Hi Jillian – wahoo! That’s so great that your family loves them! Looking forward to hearing your comments about other recipes! Enjoy!
followed your directions to a T… They turned out amazing and have the perfect shape too! Thank you!!!!!!
SO great to hear Kelly! Thanks for trying out the recipe!
I’ve made these four times, each time I’ve doubled the recipe. I have a convection oven which I set at 330. I know it’s kind of an odd temp. I don’t use a timer because I have 3 pans that I’m rotating in the oven. 2 are in at all times. They come out perfect each and every time. I take them out a little gooey and rest on the pan a couple of minutes. Move to cooling rack and the family will come running!
Hi Sally – so glad that your family loves the cookies!
This is the BEST recipe!! I’ve been on a “the best chocolate chip” hunt for months now, and this has placed itself in the top! I was a little worried at first because I only had baking powder (I used 1.5 tsp) and also that they would turn out flat (seemed to be my luck lately, but I think my problem was that I was melting cheap butter, the 31% veggie oil butter) so I tried a few things: I found that adding the 1/2c flour and using real slightly softened butter We’re EXTREMELY helpful! My hand mixer and I also got a really nice work out. I had used a pan with foil slightly greased with a little olive oil, and I stuck it in the freezer while I was mixing everything. They turned out oh so so beautiful and tasted fantastic! Thank you so much for this recipe!
Hi Shannon! I am so glad that you like the cookies! They are really my favorite!
I followed the recipe and chilled them as well but they burned around the edges and didn’t cook thoroughly in the middle. They are incredibly flat. I think chilling them made it worse. I’m sorry that this recipe didn’t work.
Hi Emma – sorry to hear this! It sounds like your oven may be a little different. Try reducing the heat to 350 and baking a minute or two longer. I’ve never had a problem with the cookies burning. Let me know if that helps!
Loved these! Had a rough day and decided it needed cookies. Crispy on the outside, chewy in the center, as promised. I went ahead and added the half cup of flour and the shape is great. Thanks so much!
That sounds like a good idea, thank you . I will try baking at 350 and adding a tbsp extra of flour. they did not go flat and stayed about 1/2 thick. The taste of them was very good, just over brown. Hopefully this idea will give me light colored cookies 🙂
I just made these and followed the direction perfectly and they do not look like the picture at all. I chilled for 2 hours and I had to bake them 2 minute longer then the max time. They are dark brown.. I had to leave them in because they would not cook in the center. 12 minutes and they where so soft in the middle, they where 40% pudding texture even after letting them cool down for 30 minutes, so I had to put them back in the oven. The taste if fine, but they turned out like a standard chocolate ship cookie recipe.. I was hoping they would be a nice light colored firm, but soft texture like the ones you buy at the grocery store that has a good bakery.. Do I need a convection oven or something? My temps are spot on as I checked with a oven thermometer.. I keep trying to find a recipe for what I want, but I just can’t find it..I’m about to just give up.. I thought yours was it and even purchase Kerrygold butter, fresh quality eggs, bakers sugar, fresh package of Brown sugar and a new can of baking powder.. What am I doing wrong? I even use a Artisan mixer and was surprised on how perfect I mixed everything without over doing mixing. The raw dough texture was perfect..
Hi Patrick – so sorry you’re having trouble. I am thinking the issue may be your oven even though you said the temperature was correct. I would suggest adding a little more flour and possibly baking at 350 degrees instead of 375. This may increase the bake time but it may help the cookies not turn brown. Were the cookies flat at all? If so, you most likely need to add more flour. Measuring flour can be finicky sometimes because everyone measures differently. Let me know if this helps!